https://minu0807.tistory.com/111
[VueJS] NuxtJS+VuetifyJS 파일 업로드 기능 만들어보기
NuxtJS와 VuetifyJS를 이용해 만들었습니다. 최종 목표는 1. NuxtJS 웹에서 첨부한 파일을 Express로 넘겨준다. 2. Express에서 Multer를 이용해 ElasticSearch에 데이터를 생성한다. 이렇게이고, 이 글에서는 1번..
minu0807.tistory.com
이 글의 2번째 목표에 해당하는 글입니다.
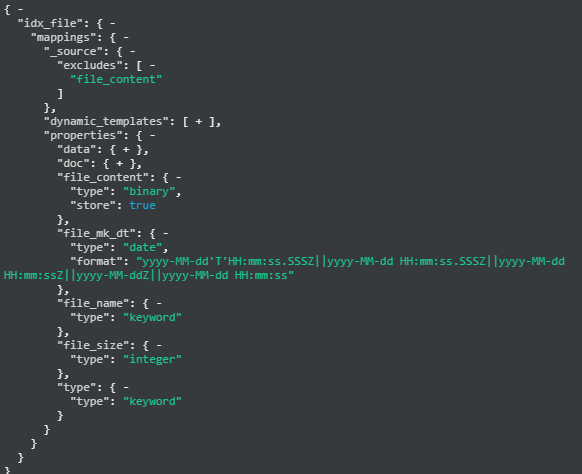
우선 엘라스틱에 데이터를 넣기 위해 만든 인덱스의 맵핑 정보.

file_content : 파일 바이너리 값
file_mk_dt : 파일 등록일
file_name : 파일명
file_size : 파일 사이즈
여기서 알아두어야 할게 file_content 필드에 store 옵션을 줬고, excludes에도 넣어주었는데.
해당 필드는 바이너리 값이라 파일 형태에 따라 값이 엄청 클 수도 있기 때문에
별도의 처리를 하지 않으면 데이터를 조회하거나 특정 이벤트를 할 때 문제가 생기는 경우가 있다.
특히 search를 할 때 출력할 필드를 지정하지 않고 그냥 search를 하게 되면 엄청난 양의 데이터가 불러와 지기 때문에 문제가 생긴다.
그래서 store 옵션을 주고 exludes 처리를 해두었다.
반드시 주의해야 할 부분이다.
이렇게 처리하면 일반적으로 search를 할 때 해당 필드는 불러오지 않고 특정 옵션을 사용해야 검색이 가능하다.
https://www.elastic.co/guide/en/elasticsearch/reference/current/mapping-store.html
store | Elasticsearch Guide [7.15] | Elastic
Stored fields returned as arrays For consistency, stored fields are always returned as an array because there is no way of knowing if the original field value was a single value, multiple values, or an empty array. If you need the original value, you shoul
www.elastic.co
이제 express
먼저 multer가 없다면 설치를 해야 한다.
npm install multer
설치가 됐으면 아래와 같이 작성
const multer = require('multer');
const storage = multer.memoryStorage(); //파일을 메모리에 Buffer 객체로 저장함
const upload = multer({ storage: storage});  //파일을 메모리에 Buffer 객체로 저장함
// const upload = multer({dest: aRoot + '/api/files/'}); //파일을 저장할 폴더
multer를 사용할 때 파일 정보를 메모리 상에 버퍼로 저장을 해둔 뒤 처리를 할 것이냐, 따로 파일로 내부에 생성할 것이냐 방법이 여러 가지였는데, 난 storage 방식으로 처리했다.
메모리 방식으로 파일을 받았을 때 출력되는 정보는 이렇다.
{
  fieldname: 'file',
  originalname: 'ts_ai_result-2021-ntm-hits.json',
  encoding: '7bit',
  mimetype: 'application/json',
  buffer: <Buffer 7b 0d 0a 20 20 20 20 22 74 6f 6f 6b 22 3a 20 35 2c 0d 0a 20 20 20 20 22 74 69 6d 65 64 5f 6f 75 74 22 3a 20 66 61 6c 73 65 2c 0d 0a 20 20 20 20 22 5f ... 361208 more bytes>,
  size: 361258
}
파일로 저장하는 방식일 때는 이렇다.
{
  fieldname: 'file',
  originalname: 'ts_ai_result-2021-ntm-hits.json',
  encoding: '7bit',
  mimetype: 'application/json',
  destination: 'C:\\smw\\minu_vuejs\\project_1\\web/api/files/',
  filename: '83061b6f744f794254cee8b781ce0c5b',
  path: 'C:\\smw\\minu_vuejs\\project_1\\web\\api\\files\\83061b6f744f794254cee8b781ce0c5b',
  size: 361258
}
https://github.com/expressjs/multer/blob/master/doc/README-ko.md
GitHub - expressjs/multer: Node.js middleware for handling `multipart/form-data`.
Node.js middleware for handling `multipart/form-data`. - GitHub - expressjs/multer: Node.js middleware for handling `multipart/form-data`.
github.com
multer에 대한 자세한 정보는 여기를 참고.
이제 받은 파일을 등록하는 방법
router.post('/file_upload', upload.single('file'), async (req, res) => {
	 const file_info = req.file;
});
upload.single('file') 이 부분을 추가해주면 된다. single로 하면 1개의 파일만 받을 수 있고, array로 하면 여러 개를 받아서 처리할 수 있다.
이 전 글에서 작성했던,

저 formData의 key 값과 똑같은 값 file을 upload.single(" ") 안에 넣어주면 된다.

그리고 받은 정보를 확인하는 방법은 req.file; 을 입력하면 된다.
여기서 single 안에 key 값이 file이 아닌 다른 값(ex: user_info) 이어도 파일 정보 확인은 무조건 req.file로 작성해야 한다.
그리고 엘라스틱에 넣기 위해 파일 정보를 바이너리로 변경해주어야 하는데
const fileContent = file_info.buffer.toString('base64');이렇게 하면 된다.
전체적인 소스
router.post('/file_upload', upload.single('file'), async (req, res) => {
  console.log('/api/v1/file/file_upload');
  let rt = {};
  try {
    const file_info = req.file;

    const fileName = file_info.originalname;
    const fileSize = file_info.size;
    const file_mk_dt = moment().format('YYYY-MM-DD HH:mm:ss');
    const fileContent = file_info.buffer.toString('base64');

    const data = {
      file_name : fileName,
      file_size : fileSize,
      file_content : fileContent,
      file_mk_dt : file_mk_dt
    }
    const rs = await es_client.index({
      index: index_name,
      type : '_doc',
      body: data
    });
    Log.info(rs);
    rt.error = false;
    rt.result = rs;
  } catch (err) {
    Log.error(err);
    rt.error = true;
    rt.msg = 'err';
    rt.result = err.message;
  }
  res.send(rt);
});
정상적으로 등록되는 걸 확인할 수 있고, cerebro를 통해 저장된 데이터를 보면 이렇다.

파일 여러 개를 등록하는 소스
router.post('/file_multi_upload', upload.array('files'), async (req, res) => {
  console.log('api/v1/file/file_multi_upload');
  let rt = {};
  const files_info = req.files;
  try {
    let bulk = [];
    for(let item of files_info) {
      const fileName = item.originalname;
      const fileSize = item.size;
      const file_mk_dt = moment().format('YYYY-MM-DD HH:mm:ss');
      const fileContent = item.buffer.toString('base64');
      const data = {
        file_name : fileName,
        file_size : fileSize,
        file_content : fileContent,
        file_mk_dt : file_mk_dt
      }
      bulk.push({"index": {"_index": index_name, "_type": "_doc"}});
      bulk.push(data);
    }
    let rs;
    if (bulk.length > 0) {
      rs = await es_client.bulk({
        body: bulk,
        refresh: 'wait_for'
      })
      Log.info(rs);
    }
    rt.error = false;
    rt.result = rs;
  } catch (err) {
    Log.error(err);
    rt.error = true;
    rt.msg = 'err';
    rt.result = err.message;
  }
  res.send(rt);
})
bulk 방식으로 작성했다.
'Node.js' 카테고리의 다른 글
| [NodeJS] ElasticSearch search 결과로 bulk 파일 만들기 (0) | 2021.11.24 |
|---|---|
| [NodeJS] ElasticSearch bulk (0) | 2021.11.23 |
| [NodeJS] child_process exec 한글 깨짐 해결하기 (0) | 2021.08.18 |
| [NodeJS] crypto를 이용한 단방향 암호화(해시 함수) 만들기 (2) | 2021.04.24 |
| [NodeJS] async 와 await (0) | 2021.04.03 |